Monday, January 4, 2010

Christmas Cooking: Gingerbread and Eggnog

Christmas Cooking 2009
GINGERBREAD and EGGNOG
Of course no Christmas holiday would be complete without whipping up a batch of fresh Eggnog. I remember waiting at the dairy section of the supermarkets in early December, waiting for them to start selling red-labeled cartons of holiday eggnog. I would ask my mom to buy an extra carton-just in case Santa was extra-thirty that year! I wasn't a good boy because, in fact, I wanted to hoard the entire carton for myself! Eggnog is sweet, rich, and creamy and your heart stops when you see the empty bottom of your cup. Mind you, this was several years ago, when I was a small tike, but now that I'm an older, seasoned hog, I can partake of 'adulty' eggnog as my mom would often say-Eggnog with spirits; brandy, rum, whiskey or whatever grows hair on your chest is spiked into the grog. At the cooking class we made two versions: spirited eggnog for the 'adulties' and plain for the children. One of the children best described eggnog as 'drinking melted vanilla ice cream without having to lick.'

Eggnog History
Many believe that eggnog is a tradition that was brought to America from Europe. This is partially true. Eggnog is related to various milk and wine punches that had been concocted long ago in the "Old World". However, in America a new twist was put on the theme. Rum was used in the place of wine. In Colonial America, rum was commonly called "grog", so the name eggnog is likely derived from the very descriptive term for this drink, "egg-and-grog", which corrupted to egg'n'grog and soon to eggnog. At least this is one version...
Other experts would have it that the "nog" of eggnog comes from the word "noggin". A noggin was a small, wooden, carved mug. It was used to serve drinks at table in taverns (while drinks beside the fire were served in tankards). It is thought that eggnog started out as a mixture of Spanish "Sherry" and milk. The English called this concoction "Dry sack posset". It is very easy to see how an egg drink in a noggin could become eggnog.


Eggnog Recipe エッグノック
12 egg yolks/whites separated
卵の黄身 12個
1 cup Sugar
砂糖 1 cup
3 cups Heavy Cream
生クリーム 3カップ
7 cups milk
2 cups Rum
ラム酒 2カップ
Pinch of salt
塩 少々
Nutmeg

In a chilled bowl BEAT egg yolks until light.
冷えたボウルに卵の黄身をいれ、白くなるまでよくかき混ぜる
Slowly ADD sugar, cream and milk and Rum
砂糖、生クリーム、ラム酒を徐々に加える
Whip separately until stiff: 2 egg whites
卵白を別のボウルで泡立てる:2個分
Fold egg whites into mixture.
卵白があわ立つまでよくかき混ぜる
Chill and serve with nutmeg.
ナツメグを加え、よく冷やす


Gingerbread Cookiesジンジャーブレッドクッキー
Preheat oven to 350F/170C
オーブンをあらかじめ170℃にあたためておく
Blend until creamy:
クリーミーになるまで下記をブレンドする:
1/4 cup butter
バター1/4カップ
1/2 cup brown sugar
ブラウンシュガー 1/2カップ
Beat in:
よくかき混ぜるb:
1/2 cup molasses
モラセス(黒砂糖でできたシロップ) 1/2カップ
Sift
下記をふるいにかける
3-1/2 cups all-purpose flour
小麦粉 3と1/2カップ
Resift with:
再度下記をふるいにかける
1 tsp baking soda
ベーキングソーダ 小さじ1
1/4 tsp. cloves
クローブ 小さじ1/4
1/2 tsp cinnamon
シナモン 小さじ1/2
1 tsp fresh ginger
しょうが 小さじ1
1/2 tsp salt
塩 小さじ1/2
ADD sifted ingredients to butter mixture,
ふるいにかけた材料にバターを混ぜる
Alternating with:
その他:
1/3 cup water.
水 1/3カップ

Work the mixture with your hands for 5 minutes,
手で5分間混ぜ合わせる
Wrap and chill for 3 hours.
ラップし。3時間冷やす
Roll out on well-floured board.
小麦粉をまぶしたボードに冷やした種をのばす
Cut shapes with floured cookie cutters and place on greased cookie sheet.
型でくりぬき、油をしいたパンに並べる
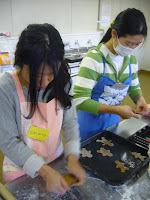
Bake for 8-10 minutes. Cool on a rack.
8-10分焼き、さます
Royal Icing ロイヤルアイシング
2 large egg whites 卵白(大)2個
2 teaspoons fresh lemon juice 絞りレモン汁 小さじ2杯
3 cups(330 grams) confectioners/
(powdered)sugar, sifted. ふるいにかけた粉砂糖 3カップ(330グラム)

In a cool bowl beat the egg whites with the lemon juice.
冷たいボウルで卵白とレモン汁を強くかき混ぜる。

Add the sifted powder in portions and continue to beat until well combined.
粉砂糖を少しづつ加え、よく混ざるまでかき混ぜる。 Tint portions of icing to desired colors. Cover with plastic wrap when not in use. Icing will dry quickly when exposed to air. アイシングに好みの色をつける。使用しないときはラップをかぶせて
おく(アイシングは空気にさらされるとすぐに固まってしまう)。
Thanks to Everyone and Have a Happy Winter Holiday!


Thursday, December 31, 2009

German Chocolate Cake

German Chocolate Cake
ドイツのチョコレート・ケーキ
For the Christmas cooking classI wanted to make a cake that was both satisfying and also devilishly demonic in calories. The cake that came to mind was a household favorite of mine, the German Chocolate cake. My mother would often make this cake anytime of the year, not especially for Christmas. The funny thing is the name aroused doubt amongst my German friends, who told me they had never heard of such a cake- or couldn't even imagine any Germans craving coconut! The name come from an unusual story...
German Chocolate Cake is an American creation that contains the key ingredients of sweet baking chocolate, coconut, and pecans. This cake was not brought to the American Midwest by German immigrants. The cake took its name from an American with the last name of "German."
1852 - Sam German created the mild dark baking chocolate bar for Baker's Chocolate Company in 1852. The company name the chocolate in his honor - "Baker's German's Sweet Chocolate." In most recipes and products today, the apostrophe and the "s" have been dropped, thus giving the false hint as for the chocolate's origin. 1957 -The first published recipe for German's chocolate cake showed up in a Dallas newspaper in 1957 and came from a Texas homemaker. The cake quickly gained popularity and its recipe together with the mouth-watering photos were spread all over the country. America fell in love with German Chocolate cake.

GERMAN CHOCOLATE CAKE recipe
One big, tall 9-inch cake; about 16 servings
For the cake:
2 ounces bittersweet or semisweet chocolate chopped2 ounces unsweetened chocolate, chopped6 tablespoons water8 ounces (2 sticks) unsalted butter, at room temperature1 ¼ cup + ¼ cup sugar4 large eggs, separated2 cups all-purpose flour1 teaspoon baking powder1 teaspoon baking soda½ teaspoon salt1 cup buttermilk, at room temperature1 teaspoon vanilla extract
For the filling:1 cup heavy cream1 cup sugar3 large egg yolks3 ounces butter, cut into small pieces½ teaspoon salt1 cup pecans, toasted and finely chopped1 1/3 cups unsweetened coconut, toasted
For the syrup:1 cup water¾ cup sugar2 tablespoons dark rum
For the chocolate icing:8 ounces bittersweet or semisweet chocolate, chopped2 tablespoons light
corn syrup1 ½ ounces unsalted butter1 cup heavy cream

1. Butter two 9-inch cake pans, then line the bottoms with rounds of parchment or wax paper. Preheat the oven to 350°.
2. Melt both chocolates together with the 6 tablespoons of water. Use either a double-boiler or a microwave. Stir until smooth, then set aside until room temperature.
3. In the bowl of an electric mixer, or by hand, beat the butter and 1 ¼ cup of the sugar until light and fluffy, about 5 minutes. Beat in the melted chocolate, then the egg yolks, one at a time.
4. Sift together the flour, baking powder, baking soda, and salt.
5. Mix in half of the dry ingredients into the creamed butter mixture, then the buttermilk and the vanilla extract, then the rest of the dry ingredients.
6. In a separate metal or glass bowl, beat the egg whites until they hold soft, droopy peaks. Beat in the ¼ cup of sugar until stiff.

7. Fold about one-third of the egg whites into the cake batter to lighten it, then fold in the remaining egg whites just until there's no trace of egg white visible.
8. Divide the batter into the 2 prepared cake pans, smooth the tops, and bake for about 45 minutes, until a toothpick inserted into the center comes out clean.
Cool cake layers completely.
While the cakes are baking and cooling, make the filling, syrup, and icing.

To make the icing:
1. Place the 8 ounces of chopped chocolate in a bowl with the corn syrup and 1 ½ ounces of butter.
2. Heat the cream until it just begins to boil.
Remove from heat and pour over the chocolate. Let stand one minute, then stir until smooth. Let sit until room temperature

To make the filling:
1. Mix the cream, sugar, and egg yolks in a medium saucepan. Put the 3 ounces butter, salt, toasted coconut, and pecan pieces in a large bowl.
2. Heat the cream mixture and cook, stirring constantly (scraping the bottom as you stir) until the mixture begins to thicken and coats the spoon (an instant-read thermometer will read 170°.)
3. Pour the hot custard immediately into the pecan-coconut mixture and stir until the butter is melted. Cool completely to room temperature. (It will thicken.)
To make the syrup:
1. In a small saucepan, heat the sugar and water until the sugar has melted. Remove from heat and stir in the dark rum.

To assemble the cake:
Remove the cake layers from the pans and cut both cake layers in half horizontally, using a serrated bread knife.Set the first cake layer on a cake plate. Brush well with syrup. Spread ¾ cup of the coconut filling over the cake layer, making sure to reach to the edges. Set another cake layer on top.
Repeat, using the syrup to brush each cake layer, then spreading ¾ cup of the coconut filling over each layer, including the top.
Ice the sides with the chocolate icing, then pipe a decorative border of chocolate icing around the top, encircling the coconut topping.

The cake can be stored in a cool place for up to a week. It goes well with a hot cup of coffee and be sure not to skimp on the icing- the more the better!

Monday, November 30, 2009

Thanksgiving 2009

Thanksgiving
Roast Turkey
We all came together to have a traditional Roast Turkey and fixings dinner. When I was growing up the best part of Thanksgiving was the time spent sitting around the table and sharing a finely roasted turkey and feasting on all the goodies...second helpings...third helpings...until I became a stuffed turkey myself!
Turkey is not a common dish in Japan and most of the cooked turkey you may happen to find in the supermarkets is processed, turkey-ish bologna slices.
Frozen turkeys can be found in speciality import shops, like Cost Co., or Kinokuniya.(I got these birds from the US Base in Yokosuka) but the bigger problem is finding an oven that will house the bird while roasting. Most families homes in Japan don't have adequate sized ovens. So, the cooking room we rented had 4 large gas heated ovens.
The used the follow recipes:

Roasted Turkey
ローストターキー

Preheat oven 450F/232C
オーブンを  232℃に温めておく
Wash and rinse Fresh Turkey thoroughly. Remove the neck and giblets and boil in 4 cups of seasoned water for 1 hour. Reserve stock to add to the stuffing later.
ターキーを洗う


Rub the outer skin of the turkey with tarragon butter and under the skin of the breast bone. Stuff the turkey with plenty of stuffing and secure the legs with string.
Place turkey on a wire rack above a large over pan 
オーブンパンの上にワイヤーラックを置き、そこへターキーをのせる
Roast turkey according to weight. Baste every 30 minutes. Test Turkey temperature.
ターキーの大きさにより、ローストする

Sausage Dressing/Stuffing (makes 5 cups)
30分おきに肉汁をターキーにかけ、温度を確認する
ソーセージドレッシング/詰め物 (5カップ分)
1 cup sausage meat, chopped. Drain off surplus fat.
ソーセージ 1カップ
2 tbs. butter
バター 大さじ2
1/2 cup yellow onion, chopped
みじん切りした玉ねぎ 1/2カップ
1/4 cup fresh parsley, finely chopped
みじん切りしたパセリ 1/4カップ
1/2 cup chopped celery (optional)
みじん切りしたパセリ 1/2カップ(オプションで)
1 cup mushrooms, sliced
スライスしたマッシュルーム 1カップ
1 tsp salt 1/2 tsp ground b pepper
塩 小さじ1  コショウ 小さじ1/2
1/2 tsp paprika
パプリカ 小さじ1/2 1 tsp fresh tarragon, minced
みじん切りしたタラゴン 小さじ1
A pinch of nutmeg and all-spice
ナツメッグ・オールスパイス 少々 1 cup walnuts, chopped
みじん切りしたくるみ 1カップ
1/2 cup green apple, chopped カットしたりんご 1/2カップ
Heat and stir in a skillet until brown
フライパンを温め、ソーセージに焼き色がつくまで炒める
余分な油をすてる
Mix warm ingredients in a large bowl with:
上記の材料をフライパンに加え、いためる
Prepare dressing for turkey. Remaining stuffing can be
wrapped in foil and warmed in an oven.
4 cups diced, stale bread cubes.
1/2 to 1 cup Turkey stock. 食パンをサイコロ状にカットしたもの4カップをボウルに入れ、フライパンでいためた材料を加え、そこにターキーの肉汁 1/2カップを加えてまぜる

We all sat down after a long day of waiting and asking 'is it ready yet?' Oops! I almost forgot the most important thing- make sure you makes lots of extra gravy because it runs out quickly!
Turkey Gravy
グレービーソース
2 tbs Turkey drippings, strained
ターキーを焼いた際の肉汁 大さじ2
2 tbs butter
バター 大さじ2
4 tbs flour
小麦粉 大さじ4
Salt and black pepper
塩・コショウ
1/4 cup dry Sherry
シェリー酒 1/4カップ
1/2 tbs soy sauce
しょうゆ 1/2カップ
1 to 1-1/2 Cups Turkey Stock
ターキーのダシ 1-1/2カップ

Heat drippings and butter in a flat pan.
フライパンを温め、バターを溶かす
Add sherry and burn off alcohol.
シェリー酒を加え、アルコールをとばす
Stir in flour to dripping with wire whisk to form a paste.
小麦粉を少しずつ加えながら、ペーストになるように混ぜる
On low heat, gradually add Turkey stock stirring constantly.
弱火にし、少しずつターキーのダシを加え、均一になるようかき混ぜる
Cook slowly over low heat until thickens.
弱火のままゆっくり混ぜる
Add Soy Sauce and S/P to taste.
しょうゆと塩・コショウで味を調える

Monday, October 26, 2009

Halloween Jack-o-Lantern ジャックランタンを作る方法

How to make a Halloween Jack-o-Lantern ジャックランタンを作る方法 Every Halloween we would go to the store and buy a big orange French pumpkin from the supermarket at virtually no cost and carve it up into a Jack-O-Lantern to put on display on Halloween night. Here in Japan, however, the price of the hollow French Pumpkin in much more stingy to the pocketbook . The common Asian Pumpkin is much meatier and, therefore , harder to hollow-out and carve.But the best place to get a French Pumpkin is COST CO. But go and get one early- because they sell out quickly!
I had a chance at many schools to have a demonstration for the students, who had never seen it being made before.

An old Irish folk tale tells of Stingy Jack, a lazy yet shrewd farmer who uses a cross to trap the Devil. One story says that Jack tricked the Devil into climbing an apple tree, and once he was up there Jack quickly placed crosses around the trunk or carved a cross into the bark, so that the Devil couldn't get down. Another myth says that Jack put a key in the Devil's pocket while he was suspended upside-down


ジャックランタン(Jack-o'-Lantern ジャック・オ・ランターン)は、アイルランド及びスコットランドに伝わる鬼火のような存在。名前は"ランタン持ちの男"の意。普通の火の玉の姿の他、光る衣装を身に纏うカボチャ頭の男の姿であらわれる事もある。別名提灯(ちょうちん)ジャック。
生前に堕落した人生を送ったまま死んだ者の魂が、死後の世界への立ち入りを拒否され、悪魔からもらった
石炭を火種にし、萎びて転がっていたカブをくりぬきそれを入れたランタンを、片手に持って彷徨っている姿だとされている(→ウィルオウィスプ)。また、悪賢い遊び人が悪魔を騙し、死んでも地獄に落ちないという契約を取り付けたが、死後、生前の行いの悪さから天国へいくことを拒否され悪魔との契約により地獄に行くこともできず、カブに憑依し安住の地を求めこの世を彷徨い続けている姿だともされている。
この話がアメリカに伝わったのち、カブのランタンは、移民したアイルランド人によりアメリカでの生産が高かったカボチャのランタンに変化したが、スコットランドでは現在もカブ(
ルタバガ)を使っている。この他、毎年10月31日のハロウィンの日に作るカボチャのロウソク立てをジャックランタンと呼び、善霊を引き寄せ、悪霊達を遠ざける効果があるといわれている。
旅人を迷わせずに道案内をする事もあるという。

First of all, to make a Jack-O-Lantern you will need to look through all the pumpkins to find a nice, well-balanced pumpkin. 良いかぼちゃを選んでください。Not too oddly shaped and very few blemishes or bruises would be nice. Go ahead! Pick it up, become friendly with your pumpkin. あなたのかぼちゃは、丸く、良いバランスを持っているはずです。Imagine the face you want to have on it. Sketch out the face on the pumpkin with a pen. かぼちゃに表面を引いてください。
lid fall straight in the pumpkin. You want the lid to rest comfortably on the top.斜めに切れて、ふたを作ってください。Scoop out all the seeds and fibers from the inside . Keep the seeds! After roasting the seeds in salt, they are great snacks内部からすべての種子を取り除いてください。種子を無駄にしないでください。!Then cut out the face and carve the features.かぼちゃの表面を彫ってください。

Saturday, October 24, 2009

Halloween Cooking かぼちゃカップケーキ!

Halloween Pumpkin
Spice Cookies
and Cupcakes
PUMPKIN Spice Cookies パンプキンスパイスクッキー
1 cup brown sugar ブラウンシュガー 1カップ
1/2 cup softened butter 柔らかくしたバター 1/2カップ
1 egg + one egg yolk 卵1個 + 卵黄1個

1 tsp vanilla extract バニラエクストラクト 小さじ1杯
          メープルシロップ 小さじ2杯
3 tbs pureed Pumpkin meat カボチャピューレ 大さじ3杯
2 cups flour 小麦粉 2カップ
2 tsp baking powder ベーキングパウダー 小さじ2杯
1/2 tsp nutmeg ナツメグ 小さじ1/2
1 tsp cinnamon シナモン 小さじ1
1/4 tsp cloves クローブ 小さじ1/4
1/2 tsp grated ginger すりおろしたショウガ 小さじ1/2
1/4 tsp allspice オールスパイス 小さじ1/4
1/4 tsp salt 塩 小さじ1/4

Preheat oven to 350 degrees 
オーブンは350度(??℃)に予熱しておく
Prepare cooking sheets with cooking oil. 
オーブン皿に油を塗っておく。 
Cream together butter with sugar until fluffy and light. 
バターと砂糖をふわっと軽くなるまで混ぜる
Add egg and vanilla. Blend well
卵とメープルを加えてよく混ぜる
Stir together dry ingredients in portions until blended.
粉類を少しづつ加えてよくかき混ぜ合わせる
Chill dough for 30 minutes.
生地を30分冷やす
On a floured surface roll out the dough to 1/8” thickness.
小麦粉をまぶした台の上で生地を cmの厚さに伸ばす
Flour a cookie cutter and cut out shapes. Lay them out on a cooking sheet- be sure to keep them separated.
小麦粉をまぶしたクッキー型で型を抜き、クッキングシートに並べる。生地が重ならないように注意する。
Bake 12-15 minutes. Cool on a rack.
12から15分間焼き、棚で冷ます。
Decorate cookies with icing.
アイシングで飾りつけをする。 Using small amounts of food coloring to the icing increases the fun of making cookies!

Pumpkin Cupcakes Recipe

1 stick unsalted butter, at room temp1 c. firmly packed dark brown sugar1/3 c. granulated sugar2 large eggs, at room temp2 c. all purpose flour2 tsp. baking powder1/4 tsp. baking soda1 tsp. ground cinnamon1 tsp. ground ginger1/2 tsp. ground nutmeg1/8 tsp. ground cloves1/2 tsp. salt1/2 c. milk1 1/4 c. pumpkin puree (this about 1 15oz can)1 tsp. vanilla extract

Preheat your oven to 350 degrees. Insert cupcake liners into your muffin or cupcake pan.
In a large bowl cream together the butter and the sugars with an electric mixer on medium speed until fluffy (about 3-5 minutes). Add the eggs to the creamed mixture only one at a time. Mix well after each egg. Beat well.
In a separate bowl, combine the flour, the baking powder, the baking soda, the ground cinnamon, nutmeg, ginger, cloves and salt. Once blended, begin adding the dry ingredients to the wet ingredients a little at a time. Alternate with the milk, stirring after each addition. Mix until completely integrated.
Add the pumpkin puree and the vanilla extract and beat until smooth. Fill the cupcake liners 1/2 to 3/4 full. Bake for approximately 20-25 minutes or until a toothpick inserted into the center comes out clean.
かぼちゃカップケーキの料理法

1本の棒の無塩バター、1c.がしっかり梱包した室温で、焦茶砂糖1/3c.グラニュー糖2多、は室温2c.小麦粉2ティースプーンフルベーキングパウダーで1/4ティースプーンフルに卵を採集させます。ソーダ1ティースプーンフル挽いたシナモン1ティースプーンフル地面を焼いて、1/2ティースプーンフル地面ナツメグを活気づけてください、1/8ティースプーンフル1/2ティースプーンフル塩1/2のc.が乳をしぼる地面クローブ
1 1/4c.かぼちゃピューレ(この約1 15オンスはそうすることができる)1ティースプーンフルバニラ・エッセンス

350度にオーブンを予熱してください。 マフィンかカップケーキなべにカップケーキライナーを挿入してください。

大きいボールでは、泡立て器がミディアム・スピードにある状態で、あやふやになるまで(約3-5分)バターと砂糖を一緒にクリーム状にしてください。 一度に一つだけ、クリーム状にすることの混合物に卵を加えてください。 各卵のよく後に混入してください。 上手に打ってください。
別々のボールでは、小麦粉、ベーキングパウダー、ふくらし粉、挽いたシナモン、ナツメグ、しょうが、クローブ、および塩を混ぜてください。 いったん混合される後、一度に、ぬれた成分に乾いた成分を少し加え始めてください。 各添加の後にかき混ぜて、ミルクと交替してください。 完全に統合されるまで混入してください。

かぼちゃピューレとバニラ・エッセンスを加えてください、そして、滑らかになるまで打ってください。 1/2?3/4にカップケーキライナーをいっぱいにいっぱいにしてください。 約20-25分かセンターに挿入されたようじが、清潔な状態で出て来るまで、焼いてください。電話帳 個人 検索

Tuesday, October 20, 2009

Diwali ディーワーリー Festival


Diwali Festival in Yokohama

Near the east entrance to Yamashita Park in Yokohama stands a water tower and light statue that was donated by the Indian merchants who came to trade silk in Japan over 90 years ago. At that very spot every year a Light Festival known as Diwali is held to commemorate the rise from darkness and to celebrate good fortune. This years festival was held for two days(in conjunction with the 150 year anniversary of the Port of Yokohama)

VIDEO: http://www.youtube.com/watch?v=M1dme8-qDFk&feature=fvsr

The Indian Merchants association(IMA) invited many dancers and musicians, along with well-know restauarnts to colllaborate in a weekend of festivities. The word दीपावली(Dipavali) literally translates as a row of lamps in Sanskrit[1]. It is traditional for adherents of Diwali-celebrating faiths to light small clay lamps (or Deep in Sanskrit: दीप) filled with oil to signify good over evil within an individual. During Diwali, many wear new clothes and share sweets/snacks with each other. Some Indian business communities start their financial year by opening new account books on the first day of Diwali for good luck the following year.ディーワーリー(दीवाली, Diwali または サンスクリット語のディーパーヴリー दीपावली, Deepawali)は、インドヒンドゥー教の新年のお祝い。別名「光のフェスティバル」とも呼ばれ、10月末から11月初めのインド歴の第七番目の月の初めの日になる。この日は新月と重なる。
この日は、ヒンドゥ教の女神ラクシュミーをお祝いする。
この日は、ジャイナ教の開祖マハーヴィーラが究極の悟りを開いた日だともいわれる。

I was rather diasppointed at the low turn out of people...as well refelected when the food vendors started lowering their prices to 'anything 500 yen!" Which is a bargain for hungry curry hunters, but I had already eaten my fill of Gyros.

I had a chance to try cooking nan. The business was slow and they had been letting the custormers try placing the nam dough into the burning hot oven- wouldn't it liven things up if someone burn-off their fingers! But I wanted to try anyways....they gave me a piece of sticky nan dough and I stretched it out over a large wet cushion(like a mitten) and the cook told me to pull out one end to make the tail or handle. Then flop it quickly into the oven against the wall of the oven. It only took a 3-4 minutes to cook and we removed it with a metal hook.